Hi chickens! It's been a long time since I've contributed to this blog. I'm sorry. I will not try to justify me, I'm just lazy as fuck. This is no surprise. Everybody is aware of that.
A lot of stuff happened since the last time! The number of the year changed. That's a fact. Then we all got ill, several times, well, I did anyway. I tried to keep on making music with my pretty Game Boy, but hey, y'know, the atmosphere, all this winter... I would like to promise more regular updates in the future and everything, but I do not know if I could.
ANYWAY, I wanted to tell you a story that took place this very Saturday.
Attention, picture start!
So I was at home, Saturday morning, relaxed and all, and everybody told me "yeaaaah, y'knoow, please do more updates on your blooog, we want more musiiiic etc. Good. And me, I like to be a teaser, so I take my time y'know, like "welll, we'll seeee" and everything. But, having listened to a really nice track the previous evening on
8bitCollective that the guy (cuz it was a guy) said he had composed with Nanoloop only, I found the motivation. The motivation to find my long lost Nanoloop cartridge. A friend (
Tigrou Browne) kindly gave me his a year ago (at least) because he NEVER FUCKING understood how it worked, and it was shity and everything and to make a long story short, he actually never wanted to hear about that anymore. Ever. Thinking that would appeal me in some way as I was only collecting GB games at the time, he gave it to me. I quickly started the thing, but had no clue either about how to use it. Then the cartridge was forgotten, collecting dust in the middle of all my other games.
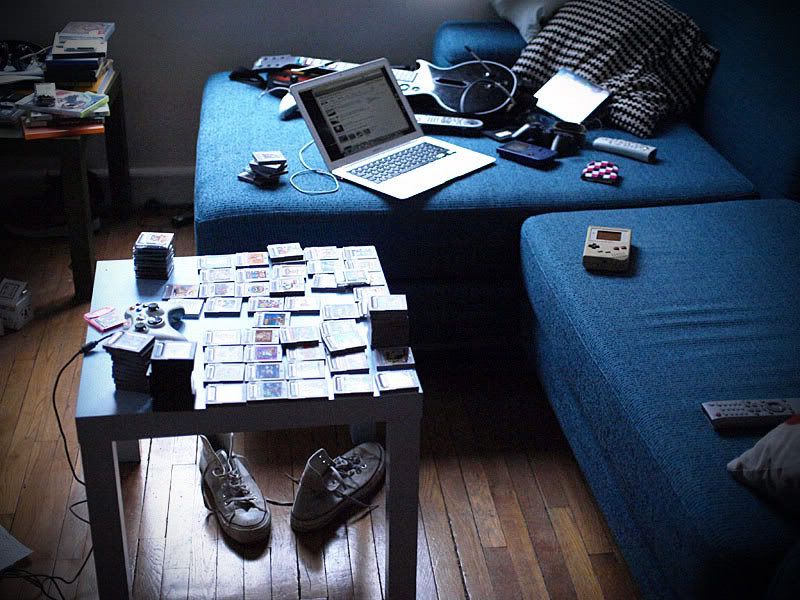
So I sorted what I had, I took all the cartridges out, and I wanted that Nanoloop BADLY.

The whole morning was nice, it was hot in my living room. I dug up in the piles of gray-ish and black carts, trying here and there a forgotten game. A level of Balloon Kid, one or two innings of Famista, the first world of MarioLand shouting "
GUTTO WEPON!! WOUUU" etc. Sausage Soup, Sympa. (It's french, it means that's cool)
Finally, I found Nanoloop.

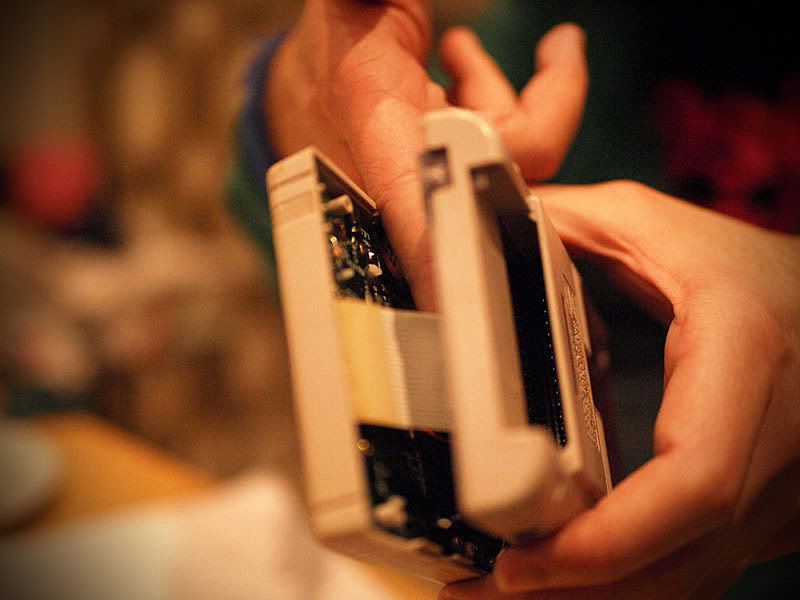
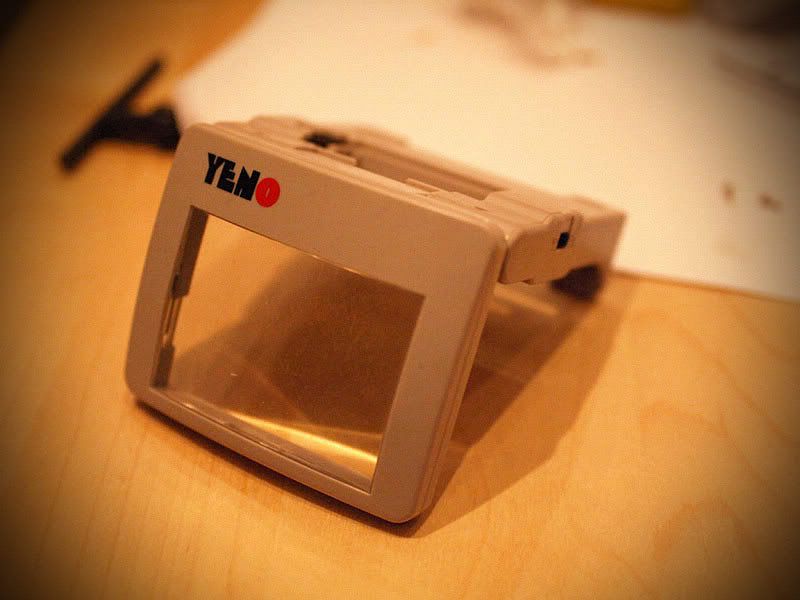
(Here is a picture found on the net, to give you an idea. But my cartridge is more or less the same except it's written NL12b .)
So, quick quick, I grab my DMG-01 and I start it! Bing! I * yet again * strictly understand nothing. I'm wondering if my cartridge doesn't have a problem or something, everything seems so erratic and sluggish. Crap crap crap and shit. That's what Nanoloop is at this very moment. I do not even manage to get a single fucking sound out of it. Good! Total disappointment. Like a broken toy on Christmas Eve. White plastic where it has broken. Unfixable. Tears.
So, I want to make some LSDJ. And fast!! But it is true that the sound of the GBColor is not top-notch, and that my big DMG is completely rotted by years and dust that was in the fucking volume pot and everything. And then I remember what my friend Tam sent me earlier this week:
A great DIY super hyper easy to understand to "Pro Sound" a big grey fat GameBoy.Basically, this is an extremely complex mod (yeah sure.) It consists in making a second sound output that does not go through the shit amp the game boy has, nor the daughterboard for the headphone jack, nor the crap speaker or the volume pot. Basically an exit row with more potatoes if you see what I mean. In french it makes sense! MORE POTATOES!!! MORE POWER!!! Like Medabots!! If you plug the baby into an amp, no breath or buzzing, and they also say you get that so-called "deeper bass" BOOM BOOM! DEEEPPPPER BAAAAAAYSSSSSS!!! WOUU!
I'm itchy. Eager. Especially since a guy from work generously gave me the other day a big gray Game Boy which he had lying around his basement, mainly because the screen was fucked: big white vertical lines were zebring the screen (yeah, zebring, like a zebra). I had it undergo a quick test run and effectively, no way you could play anything. And when it comes to reading indications from LSDJ don't even bother. Still, it was in good cosmetic condition, and the sound was very good. I decided to keep it as a chiptune "player" (no need for a screen to press start.)

We see here Baptiste (since that is his name, thank you my friend) bringing me the GB in a plastic bag. Said Bag also contained a small briefcase for GB transport, some games (pure crap) and a Yeno Light Boy-like.
So, I have a kind of guinea pig. This GB has no sentimental value to me and its screen is almost dead, I have no qualms about trying to dismantle it for the greater good!
So here we go. After a short pinball break (
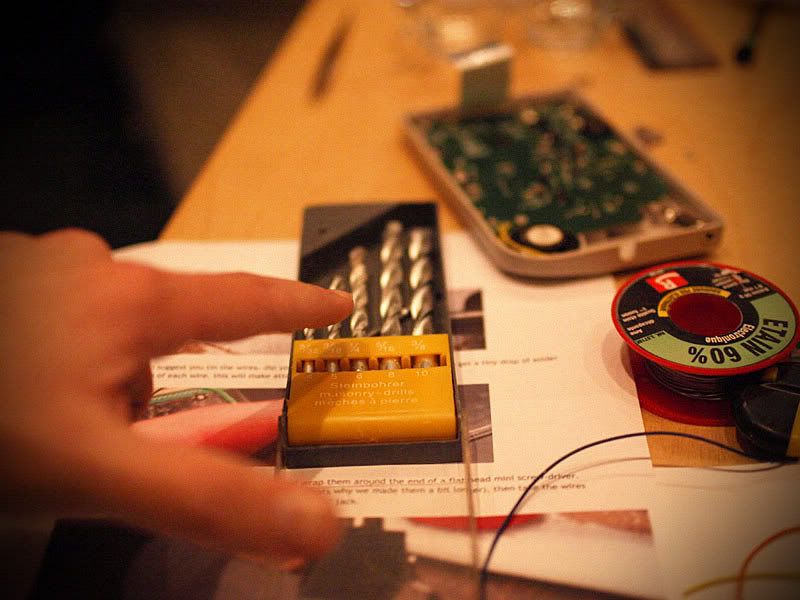
CSI: the last table from Stern) at Marcel's café at Gare de l'Est with my friend (w)eska, we head towards Eastern Paris to buy what we need for this already great adventure. Selectronic, a mini-hack pharmacist welcomes us. I bought 3 stereo jacks "3.5", 3m. of wires of color, a set of precision screwdrivers, tweezers for manipulating very fine components and two halogen LEDs because I MAY THINK that I could also try modding the Light Boy. Total cost: 6€! I feel so poor now!
A lil'go around the shops in République (Akihabara in Paris man!) to buy a Tri-Wing screwdriver (Y-shaped) which is the only way to open Nintendo gear, and we're set! We go back home. (w)eska kindly accepted to stay and assist me. His hands were also used as models on many of the pics that follow.
You unscrew the whole thing, Zoupla, you got 6 screws. Aside ...

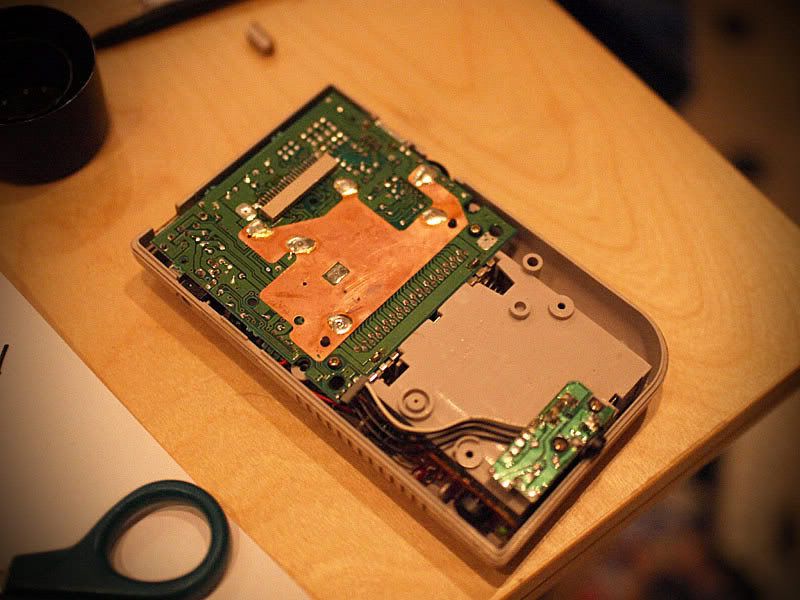
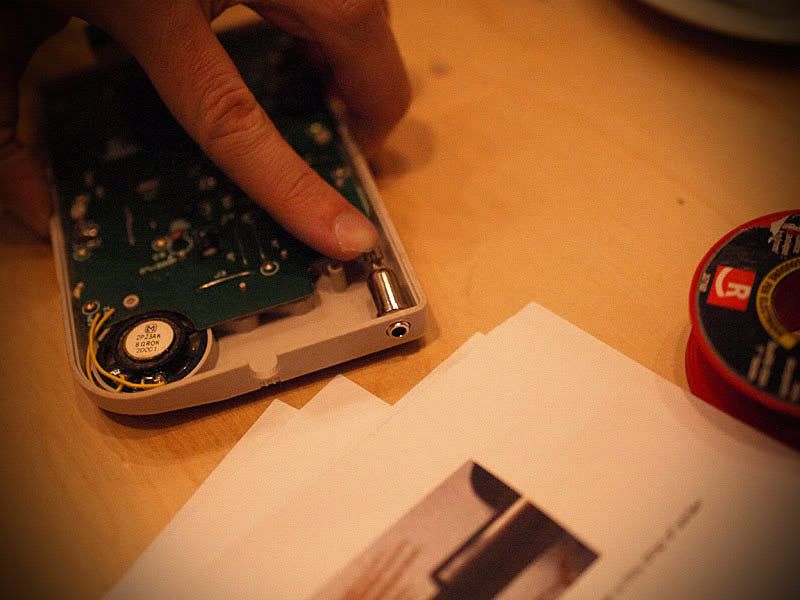
So there's a kind of a flatpin connector that connects two parts of the GB. You have to disconnect it being careful not to tear it or whatever. (Here are my hands.)
Here, (w)eska shows us the "screen" side and the afformentioned flat cable. Please note the small and cute icon meaning "human operator attention! No screws in that hole! No no no!" And what I love is how everything is completely clear. Everything is illustrated! The whole board schematics are actually printed out on it! Ha, the 80's... It was a pretty crazy time for electronics enthusiasts. You could actually understand machines with the naked eye, just by looking at the stuff you could understand what was what! WOW! Think about the PSP motherboard nowadays!

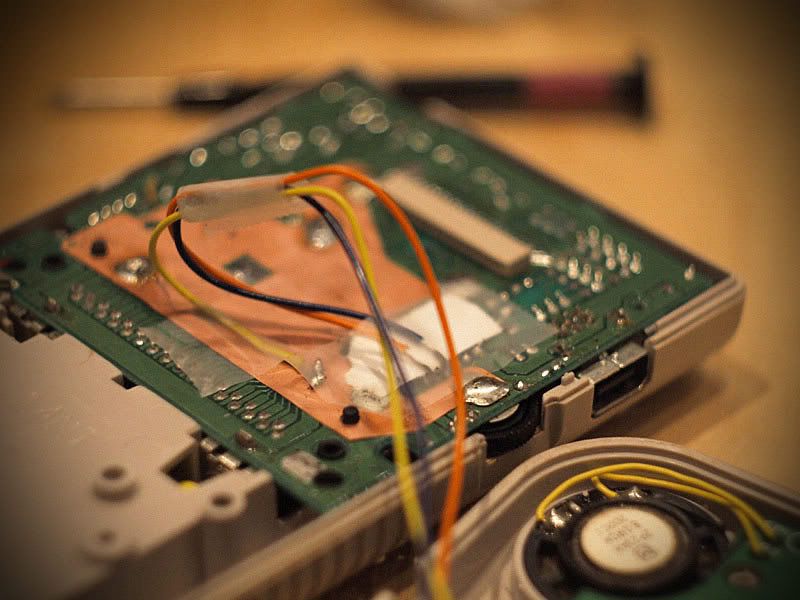
Let's twist some components on the headphones board to make a bit of room in the box, and the "battery" side is ready for receiving the welding blessing of PROSOUND MODDZZZ!!!

The "screen" side must now be drilled to receive the jack. I dig up the powerdrill from my closet. I used a drill bit designed for concrete. Well, *Normally* you should use a Dremel, or at least a drill bit for steel. But I had none, and after all, who cares? It's Effing plastic! IT WILL END UP WITH A HOLE ANYWAY! It's softer than concrete, it should work! (At first I thought about melting the hole like a pig right through the PVC hull with my soldering iron, but hey, I'm a professional or what? ...)

After several tests, here's the bit I used to get the hole the right size, it's 6. If you want to do it at home. It went just fine, don't drill too fast or it will melt the plastic.
Adjusting the jack, and there... is the tragedy.

The port doesn't stick out! Or just barely! And fuck! People are supposed (yeah people) to screw a washer on it to attach the whole thing to the hull! We can not leave it like that! It will fall inside and travel around the case, and in addition will break the welds and everything, and oh la la ... Misery.
WELL. I hereby decide that we will see later how to deal with that. In the WORST case, I'll put a jack extension cord hanging out, use it that way until I buy a longer jack that I will install later (like in "never")
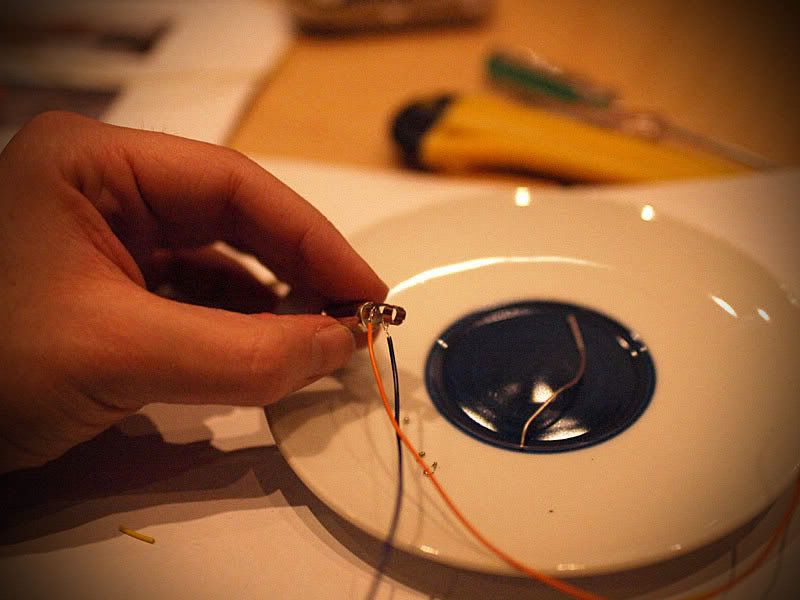
I prepare the wires, I solder them to the jack.

Then I make my solder points on the motherboard. Right on the sound chip output. Do not shake... It's hard, especially with my 20W soldering iron which is about as hot a cheap hotel hair dryer. Crappiness!!! LULZ! Anyway, I solder the the left channel, the right channel...

...and I face the impossible, the ground pin. No way I can de-solder the ground pin. It doesn't fucking melt at all! I then decide to ass flux and solder and I make a big mess, nothing welds, notching combines... I admit that I do not understand why, but everything is useless! Then well,... a ground is a ground huh?
So I decide to solder my wire directly on the big brass thing that looks to be a ground precisely. It's really a super clean job as you can see. Super professional adhesive tape, a great piece of paper hyper insulating... Real art.

Honest, Hats off to this good looking work.
Time ellipse / Time Paradox. The pic that follows was taken later in the night (it was 3 in the morning, I was back from a pancake-night at Minishort's, we watched Wall-E and the first Nightmare on Elm Street. It was cool.) But I could have and should have done it at this time of the project.
Basically, it made me feel like serious shit that this screen was not working properly, especially since (This is a complete storyline spoil, but at the time this pic was shot I knew already!) the pro-sound mod worked hyper extremely well. And I remembered that my mom's clear case GB had the same vertical dead lines issue and that many other GB a little neglected I could have seen in attics and garage sales were just the same. Other people should have experienced the same concern! Perhaps they even found the solution !!!???!!!?!!!
I grabbed my computer and I searched frantically on google with hyper specifics arguments like "bring back old vertical lines on game boy screen that's yellow" or "vertical lines fix on dmg-01" or "narcoleptic funny dog video rusty. " And after a few minutes of laughing frenzy watching the
narcoleptic dog a dozen times, I finally found
a thread on 8Bc where guys would give plenty of grandmother recipes to repair it (because obviously, everybody had the problem.) You could find any magic way there, ranging from "push like crazy on the screen until it becomes black, but does not break" to "put the game boy in the oven set to a very low temp in a towel for an hour" or the incredible "Iron the scren with an iron set on cotton-nylon" like wowzorz ...
In any case, all these remedies had one thing in common: the pressure and the heat. It would seem that the problem is caused by a kind of small flat cable controller under the screen that is not welded or plugged into a connector, but just plain glued to the contacts. The problem is that over time the glue dries, and it comes off, mostly on the edges, hence the disappearance of lines on the sides first. Well, actually, with heat, it "could" be "recast" and the glue could re-stick.
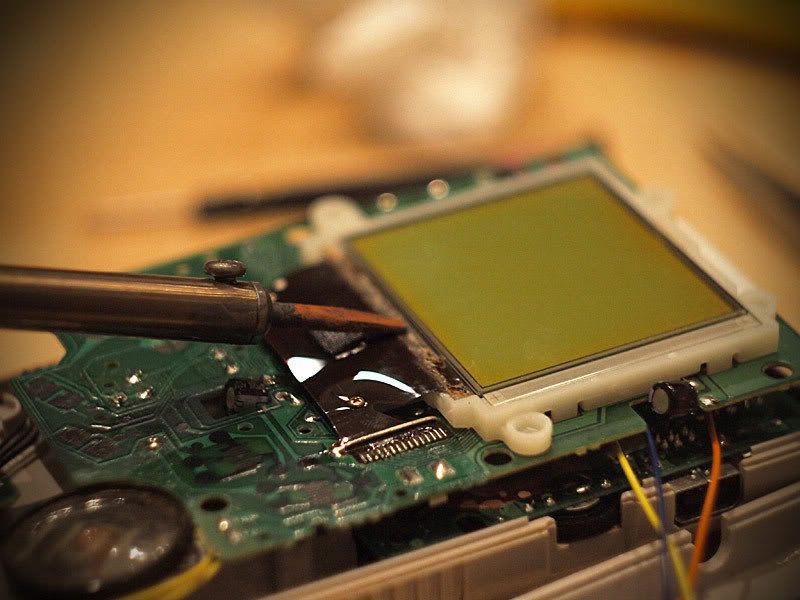
This is where having a super cheapo soldering iron running only low temperatures is appreciable, I quickly dismantle the screen plate, remove the kind of black rubber shit underneath which is glued with urine and I apply the hot tip of my iron (sassy...) just under the screen, console turned on to control if the lines are coming back.

And then, incredible miracle, the lines reappear!! If I remove the iron, they re-disappear, press hard again, and then eventually, they stay. The screen just goes a bit crazy due to the heat (understand that it becomes almost black at the bottom) but recovers quickly when colding, so no worries. Wonder-Marvel! The resurrection of the GB! WOUHOUHOU!
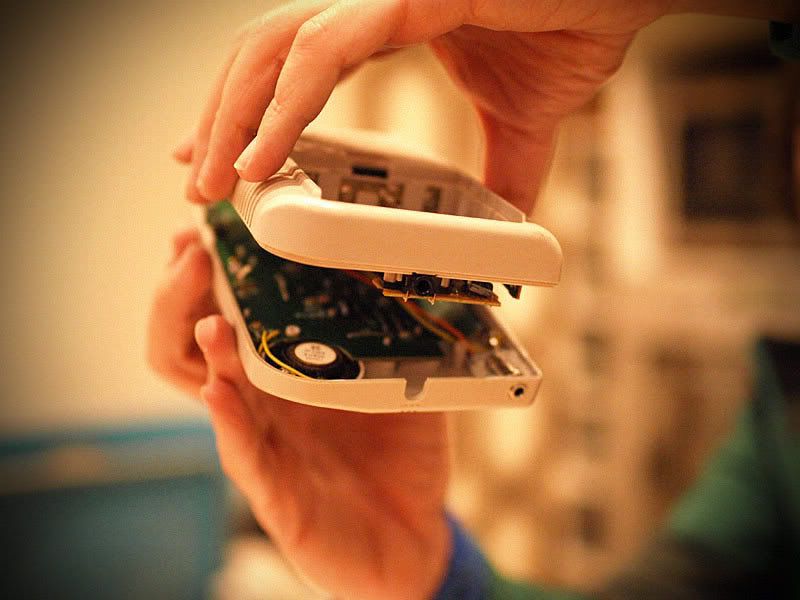
Let's go back in time then, and let's pretend I repaired the screen in the afternoon with (w)eska and everything. Well, erm, NEAT! The screen is repaired! And now, time to close everything up...
The problem that remains is the fucking jack. As we failed badly to fix it to the hull, what could we do? And suddenly, enlightenment! Eureka-from-above-style! What is stronger than all that is? What is stronger than a steel chain ? What can keep a basketball hoop glued steady to a wall ready to receive dunks like crazy? What's the material the fallout shelter are made of?
THE NEITHER NAIL NOR SCREWS OF COURSE!
I dunno how you call that in english, but in France, the Neither Nail nor Screws is a kind of crazy composite blue tac that hardens and becomes rock solid when mixing it with itself! I have tons of it at home! Hurry!!

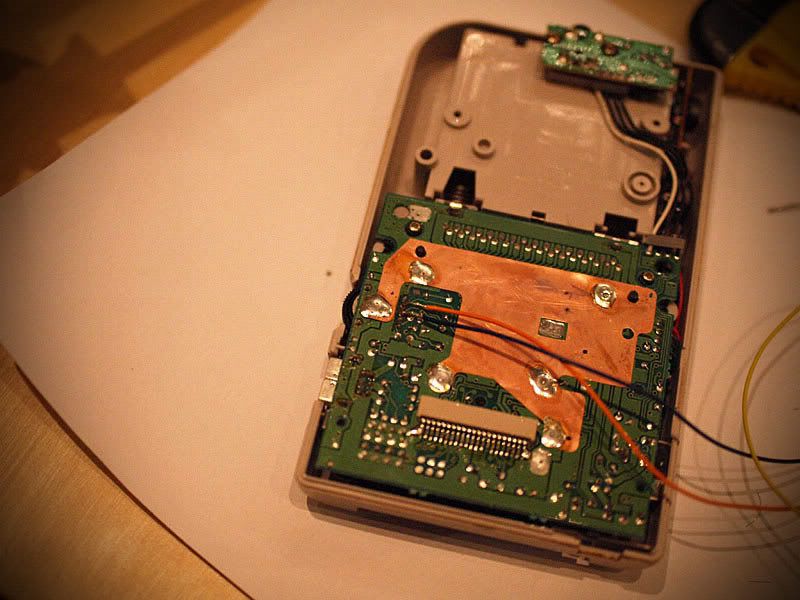
It looks plain gross seen like that, but it actually makes a super good job of holding the thing together! The headphone port is literally petrified in that amalgam or neither nail nor screws! No hassle, no mess! I begin to wonder if I shouldn't have used Neither Nail nor Screws to solder the pro sound output instead of actual metal. It would probably have held for centuries!
The only pb = can never change the jack, it becomes one with the shell. If a lousy joker was to pour, let's say chewing gum, glue or even worse, some neither nail nor screw in, I would be fucked!
I close everything, being careful when it comes to plug back in the flat cable. Do not bend it too much, it seems that it may cause vertical dead lines on the screen, and after, you need an oven and all that shit. Pain in the ass.

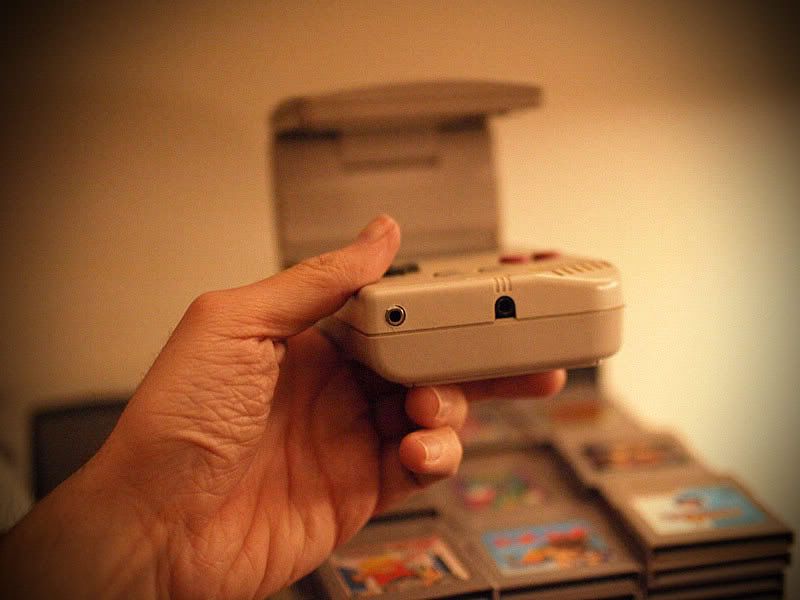
Et voilà TA TA TA!!

PRO SOUND MODDEDZ GAME BOY BABY !!!!! In addition, the greatness unexpected brought by the Neither nail nor screw is that it looks like a super "pro" mod because there's no DIY-washer srewed on the additional output! It looks like it is factory made!! (Don't open it up though) Ha ha ha. What a tube!! (Which means in french, "what a classical hit you can hear on the radio!" If that doesn't make sense to you, well, I'm french, sorry.)
I frenzy-hurry to test, and the result is amazing! No static at all, a volume multiplied by twelvethousandzz when plugged into an amp. Intersting to note tat no sound or very little sound is heard if you connect a headset, but it is not the point, so. The sound is really better defined, but as for the "deep bass" bof, I thought my bass to be already pretty deep in the begininng, I did not feel that it changed something so greatly for the "bass" matter, but in all cases very very good mod!
Enthralled by this success, I litterally jump on the Yeno Light Boy!

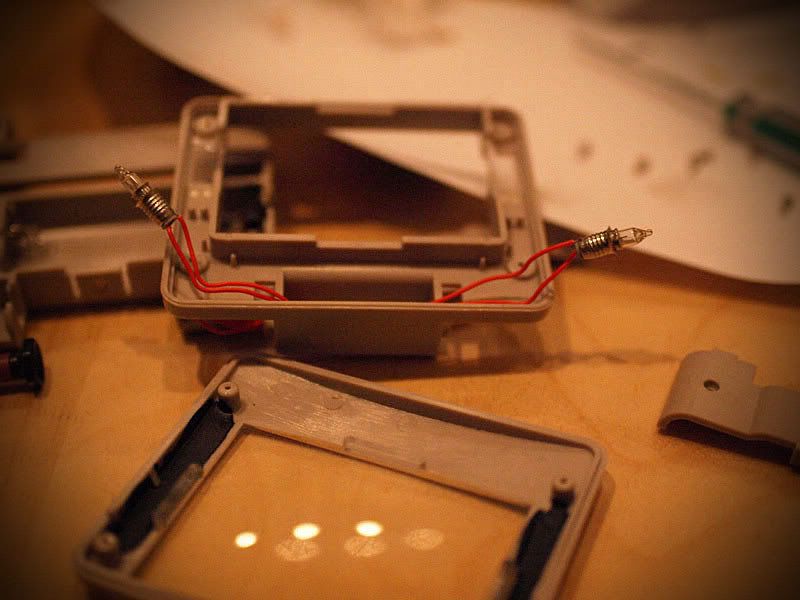
I reverse engineer like mad to discover two huge bulbs that are void of the sentence!

Ha ha, they SUCK!

"Buu, look, we shine a little, buu" USELESS PIECES OF CRAP!
That is over bitches, THE BIG WHITE LED races for your pussies!!! The whore your mooommmmmm !!!!!

Go bam, quick unsoldering, connecting! 3.2v voltage recommended for LED, 2x1.5v = 3V. Resistor protection not needed, I'm doing it like a fucking monkey-pig! GO!
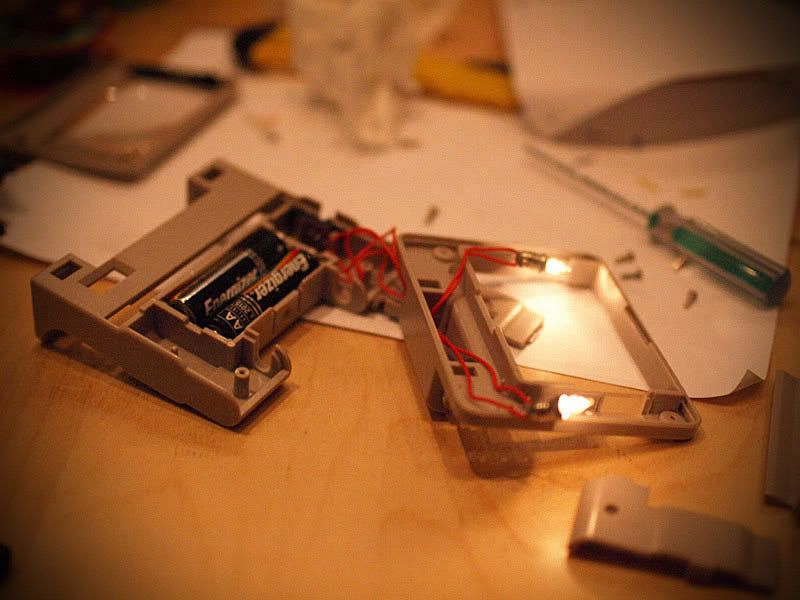
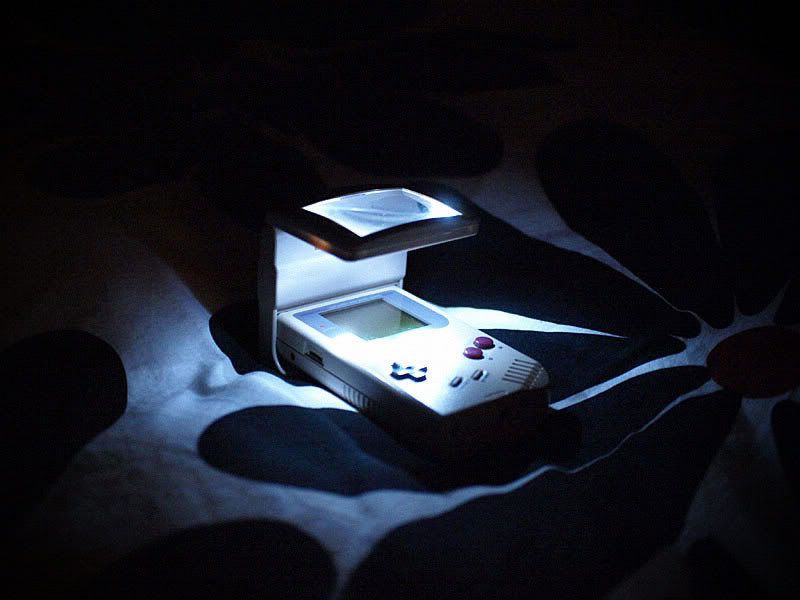
THE SUN!! IN MY KITCHEN!! BOOUBOUBOUBOUMMMMM !!!!!

I cannot hold my excitement, I close the thing and then have a look at these photos speak volumes!

My bed is ready to take FIIIIREEEEE!!

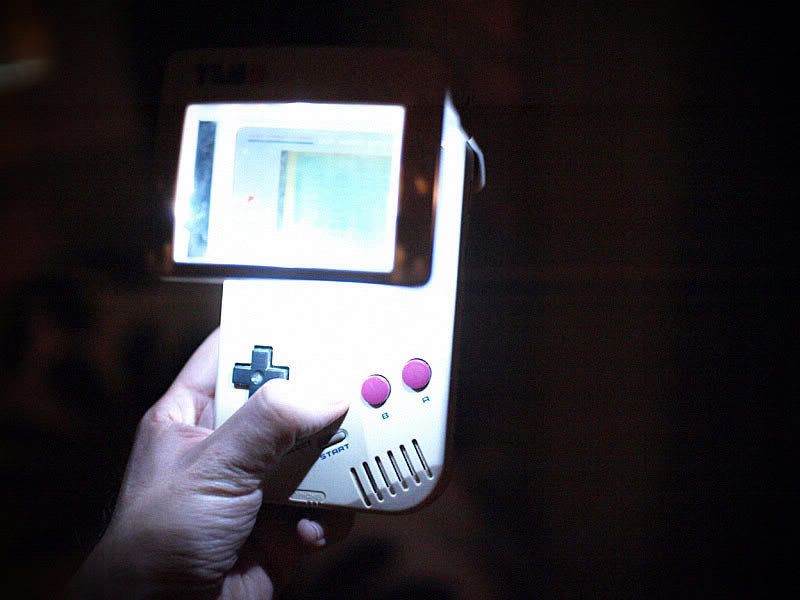
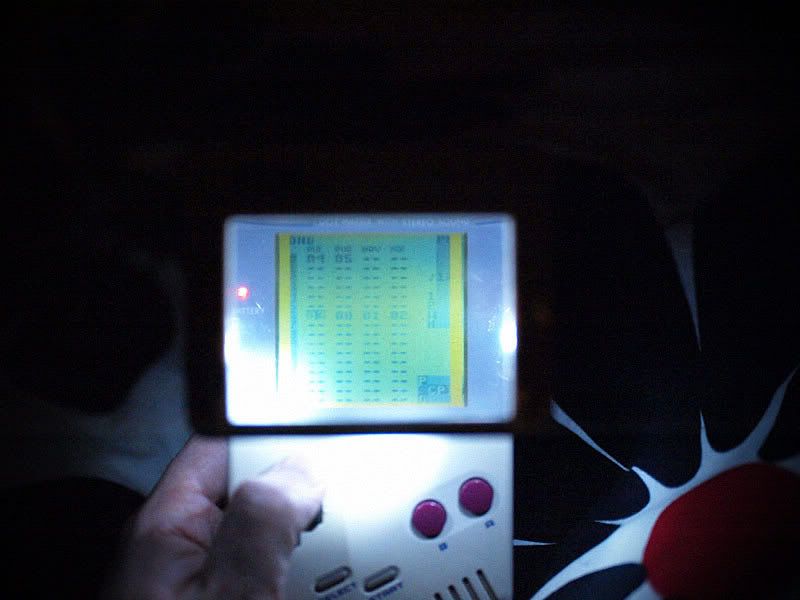
BOOM! I can do some in-the-dark-LSDJ!! DON'T GIVE A SHIIIT!!!! Take this! Darkness!! (Please note BTW the screen which was not yet repaired with dead lines on the edges.)

I feel MEGA BOOSTED!!!! And I even made a new song to celebrate! I finish it and I post here soon!
Kiss chickens!
And see you soon!
Salut les poulets! Ca fait longtemps que je n'ai pas contribué à ce blog. J'en suis désolé. Je vais pas me justifier, je suis juste un gros feignant. Ce n'est une surprise pour personne.
Il s'est passé plein de choses depuis la dernière fois! On a changé d'année déja. C'est un point d'acquis. Ensuite on est tous tombés malades, plusieurs fois, enfin, moi en tous cas oui. J'ai essayé de continuer à faire de la musique avec ma jolie Gameboy, mais bon, je sais pas, l'ambiance hivernale tout ça. J'aimerais bien promettre des updates futures plus régulières et tout ça, mais je ne sais pas si j'en serai capable.
EN TOUS CAS, j'avais envie de vous raconter une histoire qui m'est arrivée ce samedi.
Attention, ça commence.
Donc j'étais chez moi, samedi matin, peinard, et tout le monde m'avait dit "ouiii, fais plus d'updates sur ton blooog, on veut plus de musiiiiques" etc. Bon. Et moi, j'aime bien me faire prier, alors je prends mon temps. Mais, ayant écouté la veille sur
8bitCollective un morceau plutôt cool dont le type disait qu'il ne l'avait composé qu'avec
Nanoloop, j'ai eu la motivation. La motivation de chercher ma cartouche de Nanoloop. Un ami (
Tigrou Browne) me l'avait gentiment donnée il y a un an (au moins) parceque finalement il comprenait pas comment ça marchait, et ça le faisait chier. J'avais vite fait lancé le truc, mais j'avais rien compris non plus. Et puis la cartouche était restée là, à prendre la poussière au milieu de tous mes jeux.
Donc j'ai trié ce que j'avais, j'ai sorti toutes les cartouches, et j'ai recherché celle de Nanoloop.
C'était sympa, il faisait chaud dans mon salon. Je farfouillais au milieu des cartridges grises et noires, essayant de ci de là un jeu oublié. Un petit coup de Balloon Kid, un ou deux innings de Famista, le premier monde de MarioLand en criant "
GUTTO WEPON!! WOUUU" etc. Soupe Saucisse, Sympa.
Finalement, j'ai retrouvé Nanoloop
(Là c'est une image choppée sur le net, pour vous donner une idée. Mais ma cartouche est plus ou moins pareille.)
Donc, vite vite, j'attrappe ma DMG-01 et bing je lance! Je n'ai *à nouveau*
strictement rien compris. J'en suis même à me demander si ma cartouche n'a pas un problème tellement tout semble erratique et tout rame, et tout est pourri. J'arrive même pas à faire un début de son. Bon. Déception totale. Comme un jouet cassé le soir de Noël. Plastique blanc. Irréparable. Pleurs.
Du coup, j'ai envie de faire du LSDJ. Et vite! Mais c'est vrai que le son de la GB Color est pas top, et que celui de ma grosse DMG est complètement pourri par les ans et la poussière qui s'est foutue dans le potard et tout. Et là, je me souviens de ce que mon ami Tam m'avait envoyé plus tôt dans la semaine:
Un super tuto hyper clair pour modder la GB Fat avec une sortie "Pro Sound."En gros, il s'agit d'une modification extrêmement savante (tu parles) qui consiste à faire une deuxième sortie son à la GameBoy qui ne passe pas par l'ampli de merde pour les écouteurs, ni par la carte fille du haut parleur, ni par le bouton de volume. En gros une sortie "ligne" avec beaucoup plus de patate si on la rentre dans un ampli, aucun souffle ou bourdonnement façon disque de Camille, et soi-disant de "DEEPER BASS" BOUM BOUM !
Ca me démange. Surtout qu'un collègue m'a généreusement donné l'autre jour une grosse GameBoy grise dont il ne se servait plus, principalement parceque l'écran était pourri: de grosses lignes verticales blanches zebrent l'écran. Je l'avais testée vite fait, et effectivement, on ne pouvait jouer à rien, et quand à lire des indications de LSDJ, c'était même pas la peine. Par contre, elle était en bon état cosmétique, et le son était très bon. J'avais décidé de la garder pour en faire un "lecteur" de chiptune (pas besoin d'écran pour appuyer sur start.)
On voit là Baptiste (puisque tel est son nom, merci à toi collègue) m'amener sa GB dans un sac en plastique. Sac qui contient également une petit malette de transport, quelques jeux (nuls) et un Light Boy-like de chez Yeno.
Du coup, j'ai un genre de cobaye. Cette GB n'ayant pas de valeur sentimentale à mes yeux, et son écran étant mort ou presque, je n'ai aucun scrupule à la démonter pour essayer le tuto du bien.
Alors c'est parti. Après une petite séance de flipper (
le dernier Stern : CSI) chez Marcel à Gare de l'Est avec l'ami (w)eska, nous partons direction Nation, pour acheter de quoi faire ce fameux montage. Selectronic, sorte de pharmacien de la bidouille mini nous accueille. J'achète 3 jacks 3.5 stereo, 3 mètres de fils de couleur, un set de tournevis de précision, une pince très fine pour manipuler les composants et deux diodes halogènes parceque je me dis que je pourrais aussi essayer de modder le Light Boy. Coût total : 6€ ! Je me sens ruiné.
Un petit passage à répu pour acheter un tournevis Tri-Wing (en Y), seul moyen d'ouvrir du matos Nintendo, et c'est parti. On rentre à la maison. (w)eska accepte gentiment de rester m'assister, et il servira de mannequin-mains sur bon nombre des clichés qui vont suivre.
On dévisse tout, zouplà, y'a 6 vis. On écarte...
Alors y'a un genre de nappe qui relie les deux parties de la GB. On la débranche en faisant attention à pas tout arracher. (Là ce sont mes mains.)
(w)eska vous montre ici la face "écran" et la fameuse nappe. Remarquez le petit picto mignon "attention opérateur humain! pas de vis dans ce trou! non non non!" et le typon complètement lisible et limpide. Tout est schématisé! C'était une époque délirante pour l'electronique. On pouvait vraiment ouvrir un truc et à l'oeil nu, rien qu'en regardant les trucs, on pouvait comprendre ce qui faisait quoi!
Bon on fait un peu de place dans la boîte en tordant quelques composants, et la face "piles" est prête à recevoir la soudure pour la dérivation sonore.
La face "Ecran" doit maintenant être percée pour recevoir le jack. On sort la perceuse. J'ai utilisé des mèches pour le béton. Normalement, on utilise plutôt un dremel, ou une mèche acier. Mais j'avais que ça, et puis merde, c'est du plastique. (Au début je pensais faire le trou comme un porc au fer à souder en faisant fondre le PVC de la coque, mais bon...)
Après plusieurs essais, voici la mèche du bon diamètre, c'est du 6. Au cas où vous voudriez le faire chez vous.
On adapte le jack, et là... c'est le drame.
L'embout ne dépasse quasiment pas!!! Or normalement, on vient y visser une rondelle pour le fixer à la coque. On ne peut pas le laisser comme ça! Il va se balader dans la GB, et en plus les soudures vont casser et tout, et oh là là... Misère.
Bon. Je décide qu'on verra plus tard comment faire. au pire, je mets une rallonge de jack en attendant, et après j'achèterai un autre jack, plus long ce coup ci que je monterai à la place.
Je prépare les fils, je les soude au jack.
Puis je fais mes points de soudure sur la carte mère. Aux points de sortie du chip sonore. Faut pas trembler... C'est dur, surtout avec mon fer à souder 20W qui est à peu près aussi chaud qu'un sèche cheveux d'hôtel cheap. Mais bon, je soude la voie gauche, la voie droite...
... la masse par contre, impossible, le point de soudure ne se déssoude pas, je n'arrive pas à amalgamer quoi que ce soit... J'avoue que je ne comprends pas trop. Mais bon... une masse, c'est une masse.
Alors je décide de souder ma masse directement sur le gros truc en cuivre qui a l'air d'être une masse justement. C'est du boulot super propre comme vous pouvez le constater. Du scotch super professionnel, un bout de papier hyper isolant... du grand art.
Vraiment, chapeau bas.
Petite ellipse temporelle. Le cliché qui va suivre a été pris plus tard dans la nuit, (il était 3 heures et demie, je revenais d'une soirée crêpes chez Minishort, on a regardé Wall-E et Freddy 1, c'était chouette.) mais j'aurais pu et du la faire à ce moment là du montage.
En gros, ça me faisait grave chier cet écran qui déconne, surtout que (je vous spoile, mais à ce moment là, je le savais déjà) le pro-sound mod marchait hyper bien. Et je me suis souvenu que la GB transparente de ma Maman a le même problème de lignes verticales "éteintes" et que plein d'autres GB un peu délaissées que j'ai pu voir en vide grenier chiaient pareil. D'autres gens devaient avoir le même souci!!! Peut-être même qu'ils avaient trouvé la solution!!!???!!!?
J'ai empoigné mon ordi, et j'ai foncé sur google avec des arguments de recherche hyper précis genre "bring back vertical lines on old game boy screen that's yellow" ou encore "vertical lines fix on dmg-01" ou encore "narcoleptic dog rusty video marrante." Et après quelques minutes passées à rigoler en regardant le
chien narcoleptique une dizaine de fois, j'ai fini par trouver
un thread sur 8Bc où des types donnaient plein de remèdes de grand-mère pour réparer ça (car évidemment, tout le monde a eu le problème.) Ca allait de "appuyer comme un fou sur l'écran jusqu'à ce qu'il devienne noir, mais sans le casser" à "mettre la game boy au four très faiblement dans une serviette pendant une heure" ou encore l'incroyable "repasser l'écran avec un fer réglé sur nylon-coton" genre wowzorz quoi...
En tous cas, tous ces remèdes avaient un point commun : la pression et la chaleur. Il semblerait qu'en fait le problème soit causé par une espèce de petite nappe contrôleur de l'écran qui n'est ni soudée, ni enfichée dans un connecteur, mais simplement collée à même les contacteurs. Le problème, c'est qu'avec le temps, la colle sèche, et peut se décoller, principalement sur les bords, d'où la disparition des lignes sur les côtés en premier. Bon, et en fait, avec de la chaleur, on pourrait la "refondre" et recoller la nappe.
C'est là que le fait d'avoir un fer à souder cheapo hyper faible est appréciable, on démonte la plaque écran, on enlève l'espèce de merde en caoutchouc noire qui est en dessous collée avec de la pisse, et on applique, console allumée pour contrôler, le fer chaud à même la nappe.
Et là, incroyable miracle, les lignes réapparaissent!!!! On enlève le fer, elles redisparaissent, on recommence, on appuie fort, et puis finalement elles restent. L'écran pète un peu les plombs à cause de la chaleur (comprendre qu'il devient presque noir en bas) mais il rentre vite dans l'ordre en refoidissant, donc pas de souci. Miracle! La résurrection de la GB ! WOUHOUHOU!
On revient dans le temps donc, et on fait comme si j'avais réparé l'écran dans l'après-midi avec (w)eska et tout et tout. Bon, heum, SUPER L'écran est réparé! Et maintenant, on va refermer tout ça...
Le pb, c'est le jack. Comme on a pas réussi à le fixer du tout, bin que faire? Et soudain, l'illumination!! Qu'est-ce qui est plus fort que tout? Qu'est-ce qui est plus résistant que l'acier des chaînes qu'il répare? Qu'est-ce qui peut faire tenir à un mur un panier de basket prêt à recevoir des dunks de fou? Qu'est-ce qui compose le matériau dont sont faits les abris anti-atomiques?
LE
NI CLOU NI VIS BIEN SUR !!!
Cet espèce de composite fou bleu et blanc qui durcit et devient solide comme un wok' quand on le mélange! J'en ai plein chez moi! Vite!!!!
C'est dégueu vu comme ça, mais ça tient hyper bien! Le jack est littéralement pétrifié dans cet amalgame de ni clou ni vis! Sans tracas, ni mauvaises odeurs! Je me dis que j'aurais probablement du souder avec du ni clou ni vis, ça aurait sans doute tenu des siècles!!!
Le seul pb=on peut plus jamais changer le jack, il fait corps avec la coque de la GB. Si un plaisantin coulait du plomb, un chewing gum, ou même du ni clou ni vis dedans, je serais bien baisé!
On referme tout, en faisant bien attention au moment de rebrnacher la nappe du début. Faut pas trop la tordre, il paraît que ça peut faire apparaître des lignes verticales à l'écran, et après, faut un four et tout, relou.
Bon voilà on ferme, et TA TA TA!!!!
PRO SOUND MODDEDZ GAMEBOY BABY!!!!! En plus, la grande classe du Ni Clou Ni Vis, c'est que la modif fait hyper "pro" vu qu'il n'y a pas de rondelle amateur qui dépasse. Ha ha ha. Quel tube!!!
Je me dépêche de tester, et le résultat est surprenant! Aucun souffle, un volume multiplié par douzemille quand on rentre dans un ampli, aucun son ou presque par contre si on branche un casque, mais c'est pas le but. Le son est vraiment mieux défini, par contre les "deeper bass" bof, je trouvais mes basses assez deep à la base, j'ai pas l'impression que ça aie changé un truc foufou là dessus, mais c'est en tous cas très très satisfaisant!
Fort de ce succès, je me rue sur le Light Boy Yeno !
Je le désosse pour découvrir deux ampoules méga nulles qui font de la peine!
Ha ha, comme elles craignent!
"Buu, regardez, on brille un peu, buu" Nullardes!!!
Voilà la relève les meufs, DES GROSSES LED BLANCHES pour vos races la chatte la pute à ta mèèère!!!!!
Bam allez, vite fait j'déssoude, je ressoude! 3.2v de tension recommandée pour les LED, 2x1.5v = 3V. Même pas besoin de resistor de protec, j'y vais comme un sagouin! ALLEZ!!!
LE SOLEIL!!!! DANS MA CUISINE!!!! BOOUBOUBOUBOUMMMMM !!!!!
J'en peux plus d'excitation, je referme tout, et là regardez moi ces photos qui en disent long!
Mon lit est prêt à prendre FEUUUU !!!!
BOUM! Je peux faire du LSDJ dans le noir absolu, rien à fouuutre! Prends ça l'obscurité!!!! (Notez au passage l'écran qui n'était pas encore réparé avec les lignes effacées sur les bords.)
Ca m'a filé une pêche d'enfer!!! Et j'ai même fait un nouveau morceau pour fêter ça! Je le termine, et je le poste ici très vite!!!
Bisous les poulets!!!
Et à très bientôt!!!